
TRADITIONALLY, Salamba Sarvangasana has been regarded as the mother of all poses because of its nurturing quality, and Salamba Sirsasana as the father of all poses because of its clarifying effect. Initially, Salamba Sirsasana is a challenging pose that requires strength in your arms and flexibility in your shoulders to avoid compression in your neck, as well as strength in your lower back and abdomen to support the weight of your legs. Ultimately, however, you will discover the place of inner balance in the pose, where your mind is clear and alert, your body calm and suspended, and your whole being poised between action and reflection.
ESTABLISHING YOUR FOUNDATION
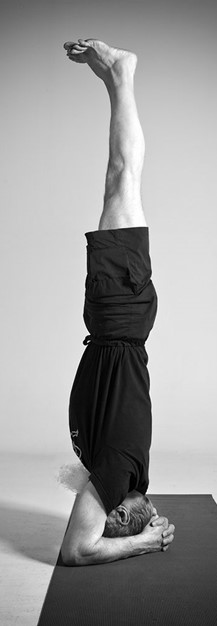 For your comfort and ease in Salamba Sirsasana, use a folded blanket or mat as your foundation, so that your head and forearms are not in direct contact with the hard floor. Make sure the blanket is a firm one. If you use a fluffy blanket, your pose will feel unstable. Place your blanket on a nonskid mat to keep it from slipping. If you prefer to use a folded nonskid mat, the same considerations apply. You need a firm, unwavering foundation under your forearms and head. If your nonskid mat is too thick and spongy, your pose will not feel secure.
Evaluating the Length of Your Arms. You may require additional props in Salamba Sirsasana, depending upon your body type and your proportions. In particular, the relationship between the length of your upper arms and the length of your head and neck is crucial. Here is a simple way to test this for yourself. Sit in a kneeling position with your sitting bones resting on your heels, or at the edge of a folding chair if you are unable to kneel. Raise your arms overhead and interlock your fingers. Then bend your elbows and bring your forearms parallel to the ceiling.
Support Under Your Head. If your forearms are raised 1 or more inches above the crown of your head, then your upper arms are proportionally long in relation to your head and neck. In this case, your shoulders may feel compressed in Salamba Sirsasana because you have no room to lengthen your arms. To remedy this situation, place an extra support under your head to give you additional height. You can use a folded facecloth, a folded hand towel, or even a folded blanket. The support can range from 1/2 inch to 3 inches in thickness, depending on the disparity between the length of your upper arms and the length of your head and neck. Experiment with different thicknesses to determine which height works best for you. If your lift is too high, your head and neck will feel jammed, so when in doubt, use less rather than more.
Support Under Your Forearms. If the crown of your head rises above the level of your forearms, then your head and neck are relatively long in comparison with your upper arms. In this case, your neck may feel compressed in Salamba Sirsasana because your head-rather than your arms-bears most of the weight. To alleviate this situation, place additional support under your forearms to give extra space for your head and neck to lengthen. Use two nonskid mats folded into strips that measure 1/2 to 1 inch thick, or even higher if that feels comfortable. Arrange your folded strips in a V shape on your foundation blanket, so that your forearms are raised and your head fits into the space between the folded strips.
COMING INTO SALAMBA SIRSASANA
Position Your Elbows. Kneel in front of your folded blanket, and place the tips of your elbows directly in line with the center of your shoulder joints, so that your upper arms are parallel to each other, and your weight rests evenly on your inner and outer elbows. Make sure that your elbows are equidistant from the front edge of the blanket. If your elbows are too far apart, then your weight falls onto your inner elbows, and your inner arms lengthen more than your outer arms. If your elbows are too close together, then your weight falls onto your outer elbows, and your outer arms lengthen more than your inner arms. Distribute your weight evenly on your inner and • outer elbows, so that your inner and outer arms give equal support.
Interlock Your Fingers. When you interlock your hands, bring the roots of your fingers firmly together, so that the cup of your hands is strong and stable. Do not leave any space between the webs of your fingers and the opposite hand. Cross one thumb lightly over the other, so that the bottom knuckles of your thumbs are evenly aligned. Check that your wrists are equidistant from the edge of your blanket.
Change the Interlock. Remember to change the interlock of your fingers on a regular basis to avoid strengthening one side of your body at the expense of the other. For example, if you practice Salamba Sirsasana six days a week, you can cross your left hand over your right hand on Mondays, Wednesdays, and Fridays, and your right hand over your left hand on Tuesdays, Thursdays, and Saturdays.
Place Your Outer Hands. When you place your outer hands on your blanket with your fingers interlocked, the cross of your little fingers may feel awkward and uncomfortable. Try this alternative: place the little finger of one hand inside the little finger of the other hand, so that the outer edges of both little fingers are in contact with your blanket. For me, this variation gives greater ease and stability.
Activate Your Hands Without Gripping. When you squeeze your fingers together and grip your hands in Salamba Sirsasana, the muscles at the sides of your neck automatically tighten. When you let your hands relax completely, they give no support in the pose. Here is a way to activate your hands without gripping. When your hands are interlocked, relax and lengthen your fingers, and then gently press your fingertips against the back of your hands and widen your palms.
Lengthen Your Outer Wrists. To bring your outer wrists into firm contact with your blanket, turn the mounds of your thumbs toward your inner wrists, and lengthen your outer hands away from your outer wrists. Then lengthen your forearms from your wrists to your elbows, so that your forearm bones press evenly into your blanket or mat.
Feel the Edges of Your Forearm Bones. If you have strong, muscular forearms, the sheer bulk of your forearm muscles may interfere with the placement of your forearm bones. Before positioning your forearms on your blanket for Salamba Sirsasana, press the fingertips of your left hand along the inner edge of your right forearm bone, and lift your inner forearm muscle away from the bone. Then repeat on the other side. As you place your forearms on the blanket, let your inner forearms soften, so that you rest directly on your forearm bones. In Salamba Sirsasana, check that your forearm bones are in firm contact with your blanket all the way from your outer wrists to your elbows. Relax your inner forearm muscles and lift your outer forearm muscles away from the floor, so that your forearm bones can sink deeper into your blanket.
Lower Your Head. Once you have placed your elbows, forearms, and hands on the blanket, widen your shoulder blades and lift your shoulders, but let your head and neck hang freely, so that the crown of your head directly faces the floor. Then slowly release your shoulders and lower your head, letting gravity be your guide. When the crown of your head rests squarely on your blanket, adjust the cup of your hands to support the back of your head. Bring your hands to your head, not your head to your hands! (For more details about adjusting the cup of your hands.
The Crown of Your Head. To maintain the natural curve of your neck in Salamba Sirsasana, the weight should be centered on the crown of your head. If your weight is too far forward, your cervical spine will be overarched. If your weight is too far back, your cervical spine will be flattened. Test this for yourself by standing in Tadasana and placing the palm of one hand on the crown of your head. First, lift the front edge of the crown of your head higher than the back edge. Observe how your chin lifts, your head drops back, and your cervical spine feels more compressed. Next, lift the back edge of the crown of your head higher than the front edge. Feel how your chin tucks, your head comes forward, and your cervical spine flattens. Finally, lift the front edge and the back edge of the crown of your head evenly into the palm of your hand, and feel how your whole spine lengthens. This neutral position is the best way to protect your neck in this physically demanding pose.
Soften Your Gaze. In Salamba Sirsasana, rest your eyes on your lower lids and soften your gaze, looking directly ahead, not down at the floor. If you habitually stare at the floor in Salamba Sirsasana to give yourself a sense of security, you may be creating tension in your eyes and at the base of your skull, and you may be shifting your weight forward on your head.
Raising Your Legs. Once you have placed the crown of your head on the blanket between your forearms, turn your toes under, lift your knees, and straighten your legs. Widen your shoulder blades and press your elbows into the blanket to stabilize your rib cage as you walk your feet in 2 or 3 inches. Then pause, draw your lower abdomen toward your sacrum to lift your pelvis higher, and walk your feet in another couple of inches.
Coming Up with Bent Knees. If you are a beginner with Salamba Sirsasana, lift your right knee into your chest, and bring your right heel toward your right sitting bone. Then push your left toes into the floor, draw your left knee into your chest, and bring your left foot to meet your right foot. Keep your heels close to your sitting bones, raise your knees toward the ceiling, and straighten your legs. You are now in Salamba Sirs as ana. When you have developed strength in your lower abdomen, you will be able to lift both knees into your chest simultaneously.
Coming Up with Straight Legs. Once you can draw both knees into your chest simultaneously, you can try coming into Salamba Sirsasana with your legs straight. As you walk your feet toward your elbows and lift your lower abdomen toward your sacrum, observe what happens to your feet and toes. If your toes feel lighter on the floor and your legs begin to levitate, you are ready to come up with your legs straight. Wait for your body to give you the signal. Practice coming down with straight legs before you attempt to come up with straight legs. Once you are adept at coming down quietly and smoothly with straight legs, without making a thumping sound as your feet touch the floor, you can safely consider coming up with straight legs. To protect your neck when coming into Salamba Sirsasana, stabilize your rib cage by widening your shoulder blades and pressing your elbows into the blanket as you walk your feet in. Let your rib cage and legs move toward each other: action and counteraction. Do not walk your feet in as far as possible: instead, walk your feet in the least amount necessary to come up with straight legs. When you walk your feet in as far as possible, you raise your legs by arching your back and contracting your paraspinal muscles. When you walk your feet in the least amount necesary, you raise your legs from the strength of your lower abdomen.
CHECKING YOUR ALIGNMENT
Once you are in Salamba Sirsasana, check your alignment, as described in the following sections, to protect your neck and enhance your balance. First, compare your right and left sides; next, adjust the balance between your front body and back body; and finally, observe how your lower body balances on your upper body.
Balancing Your Right and Left Sides. Many students experience an imbalance between their right and left sides in Salamba Sirsasana. The source of this imbalance is different for different people. The following sections help you to determine which areas of your body require your special attention in balancing your right and left sides.
Is Your Head Tilted to One Side? If your head is tilted to the right or left, one side of your neck is bearing more weight than the other. This can lead to stiffness or discomfort on the side where your neck is compressed. To adjust the tilt of your head, align your inner ears so that they are equidistant from the floor on your right side and left side, and parallel to the frontal plane of your body.
Does One Elbow Slide Out More Than the Other? If one elbow slides out more than the other, your arms do not support you evenly on your right and left sides. To adjust your arms, check that your weight is evenly distributed between your inner and outer elbows. On your stable side, observe how your weight falls equally on your inner and outer elbows. On the side where your arm slides out, notice how your weight falls more on your inner elbow. Press your wandering elbow toward the median line of the body, and stabilize your inner and outer elbows. If your elbow continues to slide despite these adjustments, place a nonskid mat over your blanket so that your practice surface is less slippery or use a strap around your elbows to hold them in place.
Are Your Collarbones Level? When your shoulder girdle is balanced in Salamba Sirsasana, your right and left collarbones are parallel with the frontal plane of your body. However, if the outer corner of one collarbone moves forward, but the other one falls back, then one of your shoulders is lifting and the other one is dropping, and your shoulder girdle is imbalanced. To adjust your shoulders, focus on the side where the outer corner of your collarbone falls back. First, relax the acromio-clavicular joint, where the outer corner of your collarbone attaches onto your outer shoulder blade. Then gently lengthen your upper arm, and move the outer corner of your collarbone forward, until both collarbones are parallel to the frontal plane of your body. When your collarbones are level, press down with your elbows and lift your rib cage away from the outer corners of your collarbones; lift evenly on your right and left sides.
Lifting Your Legs Evenly. Even if your shoulders are properly balanced, your pelvis and lumbar spine may be rotated. In this case, one leg is lifting and the other leg dropping. To lift your legs evenly, create maximum space between your thighbone and your pubic bone on each side. Lift your left thighbone away from the left side of your pubic bone and lift your right thighbone away from the right side of your pubic bone. This adjustment should bring your pelvis and legs into better alignment.
Balancing Your Front Body and Back Body. In balancing your front body and back body, first check that your head is positioned correctly, and then observe how your weight is distributed between your elbows and wrists.
Checking the Placement of Your Head. Ask a teacher or an experienced yoga practitioner to check the placement of your head in Salamba Sirsasana by standing to one side and looking at the relationship between your ears and your shoulder joints. If your ears are vertically aligned with your shoulder joints, then the crown of your head is correctly placed. If your ears are not directly under your shoulder joints, but nearer to your hands, then your head is placed too far back. If your ears are not in line with your shoulder joints, but nearer to your elbows, then your head is placed too far forward. If a teacher or friend is unavailable, here are some cues to help you assess the position of your head. When you place your head too far back, you will feel that the weight of your body is transmitted through your jawbone, that is, in front of your ears. If you place your head too far forward, you will feel the weight of your body falling on the back of your skull, behind your ears. When the crown of your head is correctly placed, the weight of your body passes directly through the center of your ears.
Head Placed Too Far Back. When you place your head too far back in your hands, the top of your head rests closer to your forehead instead of on the crown of your head, and your cervical spine is overarched. In this case, the cup of your hands is too wide in relation to your head and neck. To bring your head farther forward, come down and adjust your hands to form •. narrow cup. Let your hands and forearms form one continuous curve, with your wrists at least 2 inches apart. Do not press your hands completely together, because this forces your elbows out. Try holding a tennis ball between your hands to maintain the cuplike shape and to help relax the tension in your hands.
Head Placed Too Far Forward. When you place your head too far forward, your weight falls on the back of your head, and your cervical spine is compressed. In this case, the cup of your hands is too tight, and your forearms are short in relation to your head and neck. To place your head farther back, come down and make a wider cup with your hands without squaring your wrists. Let your hands and forearms form one continuous curve, so that your outer wrists stay in firm contact with the floor. When your hands form an open cup, lengthen your thumbs on the back of your skull, rather than crossing your thumbs.
Balancing Elbows and Wrists. Now check that the weight of your body is evenly distributed between your elbows and your wrists.
Weight on Elbows, Not on Wrists. If your weight falls onto your elbows and your wrists lift away from your blanket, you are dropping onto the front of your body and pushing your lower rib cage forward. To bring more weight onto your wrists, widen the top edges of your shoulder blades, and lift the sides of your rib cage away from your elbows. Practice Ardha Sirsasana with Forearms on the Wall as preparation for Salamba Sirsasana to help you learn this movement.
Using a Lift Under Your Elbows. If widening your shoulder blades and lifting the sides of your rib cage away from your elbows does not bring your outer wrists in contact with your blanket, try using a lift under your elbows. Take the remnant of a nonskid mat, and fold it in half so that it is Vs to 1,4 inch thick. Place the folded edge of the mat on your blanket to support the tips of your elbows only. Adjust the thickness of the mat as necessary. If the mat under your elbows is too high, you will feel too much weight on your head and neck.
Weight on Wrists, Not on Elbows. If your weight falls onto your wrists and your elbows are not in full contact with the floor, you are resting on the back of your body and compressing your neck. In this case, your upper arms may be short in proportion to your head and neck and you may need to widen the cup of your hands or place a lift under your forearms.
Are Your Lower Ribs Protruding? Ask a teacher or experienced yoga practitioner to check the median line of your side rib cage. If the median line is not vertical but diverges at an angle greater than 20 degrees, then your rib cage may be tilted forward and your lower ribs protruding. In this case, you may need an extra lift under the crown of your head to bring your side rib cage into a more vertical position. If this remedy is not effective, you may be overworking your arms and shoulders, and pushing your rib cage forward. To restore the balance between your front body and back body, try adjusting your shoulder blades to support your rib cage: this technique is described in the following section.
Adjusting Your Shoulder Blades. If your lower ribs protrude, let your rib cage rest back against your shoulder blades, and release the top edges of your shoulder blades away from your spine. (Do not use the strength of your arms or shoulders to pull your shoulder blades away from your spine. This forceful action tightens the muscles of your upper back and forces your rib cage forward.) As your shoulder blades release away from your spine, gradually lengthen the back of your upper arms, and lift the sides of your rib cage away from your elbows. In Salamba Sirsasana, think of your shoulder blades as a sling or hammock that supports your rib cage
Balancing Your Upper Body and Lower Body. In balancing your upper body and lower body, first check that your legs and pelvis are vertically aligned, and then allow your spine to find its own place of balance.
Are Your Legs Vertical? Once you have adjusted your upper body, check that your legs are vertically aligned. First, press your inner feet together, and lengthen your inner thighs from your inner groins to your inner knees. Then observe where your inner anklebones are in relation to your sitting bones. If your inner anklebones are forward of your sitting bones, then your legs are tilting forward and your pelvis tilting back. If your inner anklebones are behind your sitting bones, then your legs are arching back and your pelvis pressing forward. When your inner anklebones are directly above your sitting bones, then your legs are vertically aligned. If you are not sure about the alignment of your legs, ask a teacher or friend to look at your pose from the side. When your legs are vertical, the centers of your ankles, knees, and hip joints are vertically aligned with one another.
Legs Tilting Forward, Pelvis Tilting Back. If your legs are tilting forward and your pelvis is tilting back, then you are holding your legs from your groins and your quadriceps, and not engaging your buttocks or hamstrings. In this case, move your perineum forward from your tailbone, roll your pubic bone toward your thighs, and • lengthen the fronts of your thighs toward your knees. At the same time, firm the core of your buttocks against your pelvis, and lengthen your hamstrings from the core of your buttocks to the back of your knees.
Legs Arching Back, Pelvis Pressing Forward. If your legs are arching back and your pelvis pressing forward, then you are probably gripping your buttocks and overworking the back of your body. In this case, move your groins back and firm your quadriceps. At the same time, relax the gripping action of your buttocks, and lengthen your hamstrings from the core of your buttocks to the back of your knees. When you support your legs evenly from your groins and quadriceps at the front of the body, and your buttocks and hamstrings at the back of the body, your legs will naturally return to a vertical position.
Balancing the Spine. When your upper body is stable and your legs are vertically aligned, bring your awareness to the core of your body, and allow your spine to find its own place of balance. Let your legs rest on the platform of your sacrum. Let the curve of your lumbar spine balance on the curve of your thoracic spine. Let the curve of your thoracic spine balance on the curve of your cervical spine. Feel the weight on the crown of your head, and the lightness and length of your neck. Maintain this inward focus to strengthen and balance your spine. If you are an experienced practitioner, be aware that overworking your arms can interfere with the balance and alignment of your spine. Ultimately, Salamba Sirsasana is a balancing pose, not a buttressing pose.
COMING DOWN FROM SALAMBA SIRSASANA
If you practice Salamba Sirsasana at the Wall or Salamba Sirsasana with Blocks at the Wall, come down with your knees bent. Do not attempt to come down with your legs straight. If you practice Salamba Sirsasana near the Wall or if you practice Salamba Sirsasana in the middle of the room, come down with your legs straight; however, do this only after you have mastered coming down with bent knees, using the strength of your lower abdomen, as described in the following section. Coming Down with Bent Knees. If you practice Salamba Sirsasana at the Wall or Salamba Sirsasana near the Wall, bend your knees and slide your feet down the wall toward your pelvis. As your heels come closer to your sitting bones, press your elbows down firmly, roll your lower abdomen toward your sacrum, and bring your knees and thighs toward your rib cage. Maintain this position from the strength of your lower abdomen for several seconds. Once again, press your elbows down firmly, roll your lower abdomen toward your sacrum, and drop your feet to the floor. Rest in Adho Mukha Virasana until your breathing returns to normal. When you come down with bent knees, do you come down evenly with your right and left legs, or does one side lead the other? Is the movement smooth and sustained throughout, or do you lose control halfway through? Continue to practice coming down with bent knees until you can come down smoothly and evenly on a regular basis; then try coming down with straight legs.
Coming Down with Straight Legs. To come down with straight legs, first widen your collarbones and lift the sides of your rib cage away from your elbows to stabilize your upper body. Then release your inner groins, draw your lower abdomen toward your sacrum, and lengthen your inner hamstrings as you lower your legs. When your toes touch the floor, bend your knees and rest for several breaths in Adho Mukha Virasana.
Listen to Your Feet. If your feet hit the floor with a thump, you are probably arching your lower back and using your paraspinal muscles, rather than your abdominal muscles, to control the movement. In this case, practice Salamba Sirsasana coming up and down with bent knees to develop the strength and awareness of your lower abdomen in this pose. Once you have learned how to control the movement from the core of your abdomen, resume coming up and down with your legs straight .
VARIATIONS AND ALTERNATIVES: ADHO MUKHA SVANASANA WITH FOREHEAD SUPPORT
Adho Mukha Svanasana with Forehead Support is an excellent warm-up for Salamba Sirsasana, and an ideal alternative if you are not yet ready to place weight on your head. This preparation opens your shoulders, releases tension at the base of your skull, and relaxes your neck. Kneel on a nonskid mat and sit back on your heels. Stack two blocks on your mat about 10 inches in front of your knees. Set the first block flat and the second block on its side. Then come to a kneeling position and place your hands on the mat in line with your shoulders. Turn your toes under, lift your pelvis, and straighten your legs so that your whole forehead rests comfortably on the blocks. You may need to adjust the position or height of your blocks. In Adho Mukha Svanasana with Forehead Support, relax your shoulders and widen your shoulder blades. Then broaden your palms, firm your inner elbows, and lengthen the sides of your chest. At the same time, draw your groins into your body, and bring your weight back onto your legs. Maintain this position for about 1 minute, breathing softly; then bend your knees and rest in Adho Mukha Virasana. If you are practicing this variation as an alternative to Salamba Sirsasana, repeat two or three times.
Practice Notes. If you have flexible shoulders, do not sink into your shoulder joints. If you feel your rib cage collapsing, walk your hands out a bit farther, and lengthen the sides of your rib cage away from your inner elbows. This adjustment will strengthen your arms, lift your rib cage, and create space in your shoulder joints.
PRASARITA PADOTTANASANA
If you are unable to practice Salamba Sirsasana because of a neck or shoulder injury, high blood pressure, or other contraindicated condition, Prasarita Padottanasana is an excellent alternative. The second phase of this pose gives you many of the physiological benefits of an inverted pose without placing weight on your head or neck. Stand in Tadasana on a nonskid mat, and separate your legs 4 to 4 1/2 feet apart with your feet parallel. Place your hands on your hips with your thumbs pressing the top edge of your sacrum. With an inhalation, lift the sides of your rib cage, and let your head drop back if it feels comfortable on your neck. With an exhalation, draw your groins up into your body and extend your torso forward until your spine is parallel to the floor. Then extend your arms and place your fingertips on the floor in line with your toes.
Phase 1. In the first phase of Prasarita Padottanasana, your spine is • extended in a gentle backbend. Maintain this position for several breaths, firming your hamstrings and lifting the sides of your rib cage away from your inner elbows. Then, with an inhalation, draw your groins into your body, and lengthen your spine through the crown of your head. With an exhalation, bend your elbows and rest the crown of your head on the floor. Move your hands back so that they are in line with your heels, your upper arms are parallel to each other, and your elbows form a right angle.
Phase 2. In the second phase of Prasarita Padottanasana, your spine is gently rounded in a forward bend. Firm your hamstrings and lift your groins into your body to release your lumbar spine. Broaden your midsternum to relax your thoracic spine. Then widen your shoulder blades, and lengthen from your outer armpits to your inner elbows: this lengthens your cervical spine. Feel how the crown of your head rests lightly on the floor but your neck remains long and relaxed. Hold this position for 1 to 2 minutes; then lift your head, extend your arms, and either walk or spring your feet together. Return to Tadasana.
Practice Notes. If you are overly flexible, you may find that your head touches the floor easily, but you have no room to lengthen your spine. In this case, walk your feet closer together so that the crown of your head barely touches the floor. If your upper back feels rounded, take hold of your outer feet with your hands instead of placing your palms on the floor: this broadens your rib cage and lengthens your thoracic spine.
SALAMBA SIRSASANA AT THE WALL
If you are unable to balance in the middle of the room, practice Salamba Sirsasana at the Wall. Place a folded blanket or folded mat at the base of a wall. (If using a folded blanket, place the blanket on a nonskid mat.) Then kneel in front of the blanket or mat, place your elbows in line with the center of your shoulder joints and interlock your fingers, so that your hands are almost touching the wall. Come into the pose with bent knees, as described for Salamba Sirsasana. When using the wall for support, let your heels-but not your pelvis-rest on the wall. Draw your sacrum deeper into your body, lengthen your front thighs toward your knees, and slide your heels up the wall. When you rest your pelvis on the wall, the weight of your legs collapses onto your spine and your pose feels heavy. When you bring your pelvis away from the wall and activate your legs, your pose becomes lighter and balance comes more easily.
Practice Notes. If your feet rest on the wall in Salamba Sirsasana but your hands are several inches away from the wall, your chest may be overarched and your lumbar spine compressed. Place your hands close to the wall, so that your spine is more vertically aligned.
SALAMBA SIRSASANA NEAR THE WALL
When you are able to balance away from the wall with a fair degree of confidence, but still feel apprehensive about practicing Salamba Sirsasana in the middle of the room, try Salamba Sirsasana near the Wall as an interim measure. Place your blanket or mat a few inches away from the wall, so that when you come into Salamba Sirsasana, your back is about 1 1/2 feet away from the wall. In this way, you can gradually overcome your physical and psychological dependence on the wall. Come into the pose either with bent knees or with straight legs, as described for Salamba Sirsasana. In Salamba Sirsasana near the Wall, start with both feet resting on the wall, and bring your right leg away from the wall to a vertical position. Then press your lower sacrum deeper into your body, firm the core of your left buttock, and bring your left leg forward to meet your right leg. Maintain your balance for several breaths, then repeat this adjustment with your other leg. Keep your left leg lifting vertically, and bring your right foot back to the wall. Press your lower sacrum into your body, firm the core of your right buttock, and bring your right leg forward to meet your left leg. The strength of your legs will help you to balance.
Practice Notes. Practicing Salamba Sirsasana at the Wall prevents you from overarching your back, because your hands are close to the wall; however, it also makes balancing more difficult. The wall sucks you into its orbit like a magnetic force. When you feel you have developed the necessary strength to balance, place your hands a few inches farther from the wall, and practice Salamba Sirsasana near the Wall to free yourself from the vortex and establish your independence.
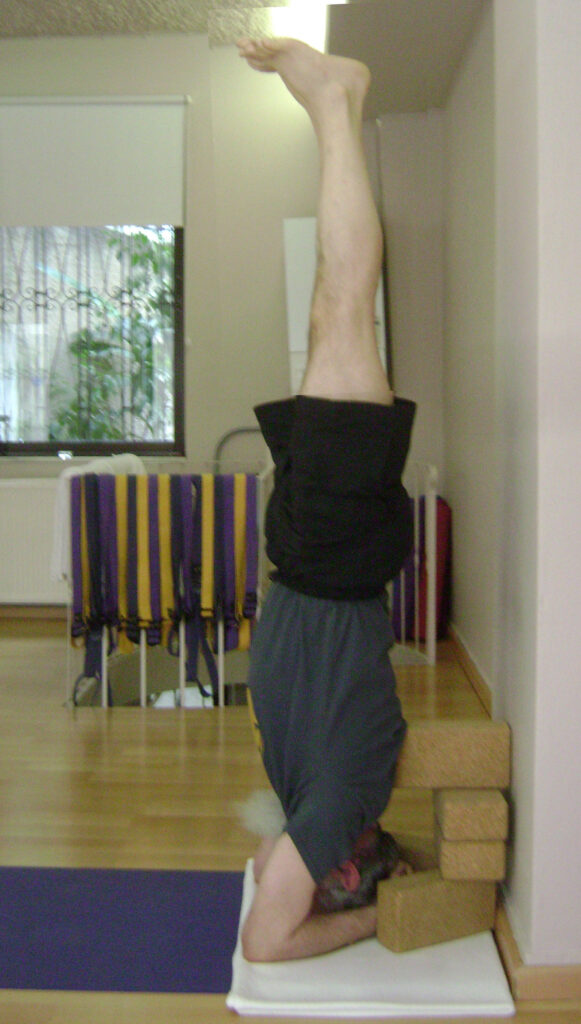 SALAMBA SIRSASANA WITH BLOCKS AT THE WALL
If you have a kyphosis (rounded thoracic spine) or scoliosis (lateral curvature of the spine), or if the muscles of your upper back are very tight, practicing Salamba Sirsasana with Blocks at the Wall will give support to your upper back and allow your shoulder joints to open. For this variation, fold a nonskid mat in half or in thirds to prevent your blocks from slipping. You will need four or five blocks, either wood or foam. First, arrange your mat at the base of a wall. Place two blocks on their sides on your mat in a V shape pointing toward the wall. Make sure the blocks are identical in size and shape, with approximatelya 60-degree angle between them. Stack another block flat on top of the first two blocks, with the long edge of the block touching the wall. (You may need to add a second block if you are tall or have a long spine.) Turn the final block on its side, with one end of the block touching the wall and the other end protruding into the room to support your upper back. Position your elbows parallel to the front edge of your mat, interlock your fingers, and place your hands between the V -shaped blocks. Check that your hands are directly underneath the overhang of the topmost block. Widen your collarbones and place the crown of your head on the floor. Lift your knees and walk your feet, inch by inch, toward your mat until the overhanging block presses against your mid thoracic spine. Keep your rib cage in firm contact with the block, and come into the pose by raising one leg at a time. In Salamba Sirsasana with Blocks at the Wall, press your thoracic spine against the block, and lengthen your upper arms away from your elbows: this will widen your upper back and create space in your shoulder joints. Hold the pose for 1 to 3 minutes. When you are ready to come down, bend your knees, slide your feet down the wall, draw your thighs into your abdomen, and roll your pelvis away from the wall.
Practice Notes. If the block does not support your back at the appropriate place, your pose may feel awkward or unstable. As a general rule, the block should be in contact with your midthoracic spine. You may need to alter the height of your blocks to find the level that feels right for you. When you find an arrangement of blocks that works for you, make a note or drawing of it so that you don’t forget.